In this blog post I will go through the process of enabling password expiration within the Microsoft 365 portal. I will also go through the default password options within Azure AD.
Note: this only applies if you’re utilising a Microsoft cloud only setup. Also, at the time of writing this post, Azure AD does not allow configuring password expiration from the Azure portal. You must carry out this action via Powershell or from the 365 portal.
If you were not already aware, Microsoft recommend that the default password policy of password never expires is left in place unless absolutely necessary. According to Microsoft’s website research has found that when periodic password resets are enforced, passwords become less secure. Users tend to pick a weaker password and vary it slightly for each reset. If a user creates a strong password (long, complex and without any pragmatic words present) it should remain just as strong in the future as it is today. It is Microsoft’s official security position to not expire passwords periodically without a specific reason, and recommends that cloud-only tenants set the password policy to never expire. Your current policy is set to never let passwords expire.
Microsoft also highlight this within the Azure Portal secure score section as shown below
If there is requirement for you to set passwords to expire within the Cloud, let’s continue with the demo
Login to portal.office.com
Click Settings and Org settings
3. Click Security & privacy
4. Click Password and expiration policy
5. By default passwords are set to never expire. Click the option Set user passwords to expire after a number of days
6. Configure settings as required, or leave the defaults and click save
Moving on, let’s take a look at the default Azure password configuration
1) Click the link to launch the Azure Active Directory admin center
2) Click Azure Active Directory
3) Click Security from the left pane
4) Click Authentication Methods
5) Click Password protection
6) and here are the default settings
The audit option applies to the custom list of banned passwords. If set to Enforce, users will be prevented from setting banned passwords and the attempt will be blocked. If set to Audit, the attempt will only be logged.
In this blog post I will add and verify a domain in the Microsoft 365 admin portal. I will also setup an email address using the newly added domain via the Exchange admin center. Finally, I will test to ensure I can send and receive emails.
Login to the Microsoft 365 Admin Portal at admin.microsoft.com (Login with Global Admin account)
Click Show All
Note: you could also add the domain by clicking Setup.
3. Click Settings
4. Click Domains
5. As you can see from the below screenshot, I have my default onmicrosoft.com domain displayed
6. Click Add Domain or purchase a new one by clicking Buy domain
7. Add a domain if you already own one and click use this domain when ready
8. I’ll be selecting the option to add a TXT record to my external domain DNS portal. Click continue
9. Microsoft provide a TXT record which I will need to add to my domain DNS portal. This process verifies that you own the domain you are trying to add to 365
10. I login to my domain portal at my domain registrars website, locate DNS and click to add a new TXT record.
11. I add the details and click Add Record
12. TXT record added successfully
13. Back to the 365 portal to verify the domain. If the domain does not verify, allow time for replication
14. The following appears after Microsoft have verified your domain. You may want to stop at this point as you may not want to configure email routing just yet without planning. I’ll explain further at step 15 below.
The text states:
Connect your domain to your Microsoft services so you can use email and instant messaging. There are a couple of options to consider, depending on how you’d like to manage domain name service (DNS) records for your domain imranrashid.co.uk.
Add your own DNS records. We’ll provide a list of DNS records that you’ll need to add for your domain at your DNS host.
15. If you decide to cancel the setup after verification, you’ll find that the new domain is now available within Exchange Admin Center. Let’s take a look. Note that your domain has been verified so if you decide to cancel the wizard at this point. You can return and continue from where you left at a later time. Let’s login to Exchange Online and check the status of the new domain aswell as add a new email alias to my mailbox. No email routing has been configured at this point.
– Access Exchange Admin Center
– Click Mail flow
– Click accepted domains and you’ll find that the domain has been added as your default domain
-I won’t be able to receive email to this domain until I continue with configuring the required DNS/MX records but I am in a position to start configuring email addresses.
– Click on recipients
-In the example below, my mailbox is still set to the default onmicrosoft.com address
– Click the edit icon or double click the name
– Click email addresses, add your email address and save
– My email address has changed from the default onmicrosoft.com to my newly added domain.
16. I want to continue with setting up my records to allow me to send and receive emails to my new email address
You can continue with the domain setup at anytime. Note that if you’re using an external email filtering solution such as Mimecast the process is different so some planning is required before you decide to make this serious change of routing email into O365. Routing email changes should be completed at a suitable time to reduce impact to your users.
So i have acccessed the Microsoft 365 Portal, clicked settings, domains and clicked my domain which is currently displaying a status of Incomplete setup
17. Click Continue Setup
18. And we’re back at the setup screen we left earlier
19. Click more options and the below options appear
20. I will be selecting the default option Add your own DNS records, click continue
21. Microsoft have provided me with further records to add to my domain portal for imranrashid.co.uk
You’ll find a further option towards the bottom of the page as shown below. If you decide to click the options below, further DNS records will be provided for Skype For Business and Intune and Mobility Device Management for Micrsosoft 365
22. For the purpose of this demo, I will only be working with Exchange Online. Let’s add the MX, CNAME and TXT records to my domain portal for imranrashid.co.uk before we continue. Back to my domain portal to add the records.
23. Records added as specified by Microsoft, back to the portal.
Note: It may take some time for changes to replicate but in most cases the process does not take long. You will want to plan the replication time into your schedule as in some cases it can take up to 24 hours for DNS records to replicate.
24. Click continue
If there are issues, Microsoft will assist by providing recommendations on how to resolve your issues, for example, if you have typed or copied a record incorrectly, Microsoft will raise this on the next page.
25. Success, domain setup completed. I should now be able to send and receive emails.
26. Earlier in this blog post I assigned an email address to my mailbox via the Exchange Admin Center, so let’s test by logging into my mailbox and test email.
By default, the below link is available to 365 users which allows users to download and install office on non-managed devices such as a personal computers as long as they have admin rights.
If you’re controlling the deployment of 365 via the Office Deployment Tool, Intune etc, you may have a requirement to disable access to this feature.
Let’s get started
Logon to the 365 admin center (portal.office.com)
Click Admin
3. Click Show all
4. Click Settings and then Org settings
5. Under Services locate Office installation options
6. Disable the settings as required and the Install Office link will no longer be visible for users
In this blog post, I will go through the process of locating the section within the 365 Admin portal which shows you which country Microsoft stores your data. As part of Microsoft transparency principles, Microsoft publish the location where Microsoft stores your content.
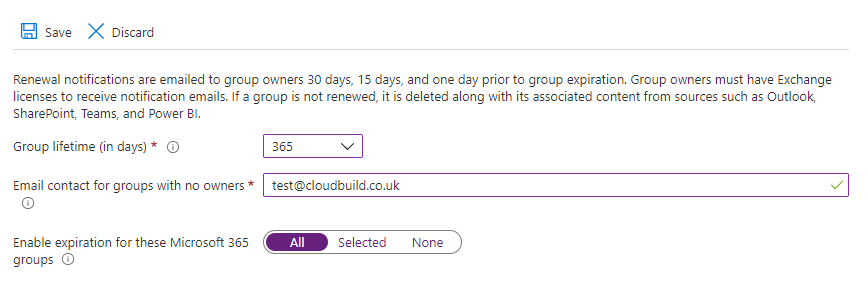
In this blog post I will go through the process of enabling 365 Group expiration. I will also assign a default owner to 365 groups where no owner exists.
Please note:
Groups with user activities are automatically renewed as the expiration nears so the group will not be deleted unless there is no user activity. With Azure AD intelligence, groups are now automatically renewed based on whether they have been recently used. This feature eliminates the need for manual action by group owners, because it’s based on user activity in groups across Microsoft 365 services like Outlook, SharePoint, or Teams. For example, if an owner or a group member does something like upload a document in SharePoint, visit a Teams channel, or send an email to the group in Outlook, the group is automatically renewed and the owner does not get any renewal notifications.
Owners of the group are notified to renew the group, if the group is not auto renewed, for example, no user activity.
Any group that is not renewed is deleted and can be be restored within 30 days by the group owners or the administrators.
You can only set an expiration policy for Microsoft 365 groups in Azure AD
Currently, only one expiration policy can be configured for all Microsoft 365 groups in an Azure AD organisation
Configuring and using the expiration policy for Microsoft 365 groups requires you to possess but not necessarily assign Azure AD Premium licenses for the members of all groups to which the expiration policy is applied.
When you first set up expiration, any groups that are older than the expiration interval are set to 35 days until expiration unless the group is automatically renewed or the owner renews it
When a dynamic group is deleted and restored, it’s seen as a new group and re-populated according to the rule. This process can take up to 24 hours.
Expiration notices for groups used in Teams appear in the Teams Owners feed.
If groups are not automatically renewed, email notifications are sent to the Microsoft 365 group owners 30 days, 15 days, and 1 day prior to expiration of the group
Owners are sent an email to confirm when the group is deleted with the option to click a link to restore the group for up to 30 day
When a group expires and is deleted, 30 days after deletion the group’s data from apps like Planner, Sites, or Teams is permanently deleted, but the group mailbox that is on legal hold is retained and is not permanently deleted.
If you have set up a retention policy for Microsoft 365 groups, when a group expires and is deleted, the group conversations in the group mailbox and files in the group site are retained in the retention container for the specific number of days defined in the retention policy. Users won’t see the group or its content after expiration, but can recover the site and mailbox data via e-discovery.
Let’s get started with configuring Microsoft 365 group expiration
Login to the Azure Portal portal.azure.com
Click Azure AD or browse and click using the search box
Click Groups
4. Click Expiration
5.
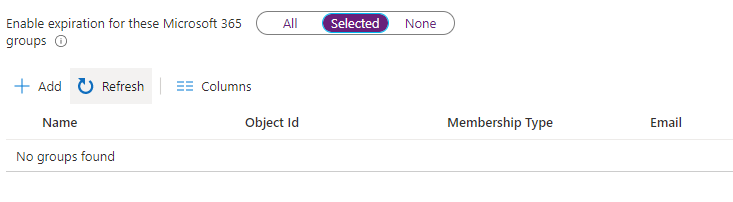
– Specify the number of days for group expiry – Add a contact email address or use several email addresses by separating them with a semicolon ; – If you wish to apply the policy to all 365 groups, select All – If you wish to select a number of 365 groups, click Selected and locate the groups you would like to apply the expiration policy.
Remove Microsoft 365 group expiration policy
In the event you need to remove the policy
Select Azure Active Directory > Groups > Expiration
Set Enable expiration for these Microsoft 365 groups to None
Subscribe
Subscribe to new tech posts.
We will never send you spam email or forward your details to third parties.