In this post, I will perform the steps as an internal requestor named Patti Fernandez and request access to the newly created access package created as part of the previous blog post.
Open your access package
2. From the left pane click Overview
3. You could request access via the unique access link available under the field My Access portal link
4. Or the user requesting access could visit https://myaccess.microsoft.com
Previously I created a package and granted a group permission which included a user named Patti Fernandez
I visit https://myaccess.microsoft.com and login as Patti Fernandez
5. From the left pane, click Access packages
6. and there is the Sales Access Package I created earlier. Under the column Actions, click Request.
7. Before clicking continue, I have the opportunity to check the resources I will be granted access to by clicking the Resources tab. I can also copy the link and share with a colleague.
Click continue
8. As per my request policy I configured earlier, I am asked to provide a justification. I also allowed users to specify if they require access to a package between certain dates so the option is available for the requester if they wish to input a custom date.
Click Submit Request
9. I now need to wait for approval. Why? because I specified that approval was required before a user could gain access to the package. The approver was me. I’ll receive an email to notify me a request is pending approval.
10. I login to https://myaccess.microsoft.com as the approver
11. From the left pane, click Approvals.
12. Review the access and approve or deny. Click Submit
The user is granted access to the resources I specified in the access package.
I hope you found this post useful. See you at the next post.
As part of Azure Storage Accounts, lifecycle management policies allow you to automatically manage the data lifecycle of your blobs. These policies are particularly useful for optimising costs by transitioning blob data to the appropriate access tiers, or deleting data when it’s no longer needed. With rule based policies, you can transition data between access tiers, for example, you can move blobs from the hot, cool, cold and archive tiers after a set period of inactivity. For example, if a blob was created/last modified 30 days ago, then move the blob to cold storage automatically. Lifecycle management rules allow you to efficiently manage your data’s lifecycle. Whether you’re optimising costs by moving data or ensuring compliance, Azure Storage lifecycle management simplifies and automates the process. To learn more about pricing for the different storage tiers, visit the following link Azure Storage Blobs Pricing.
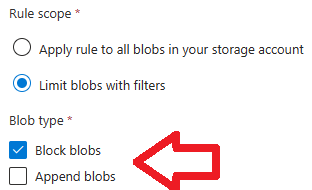
The purpose of this post is to explain the options available when configuring a lifecycle management rule in a Storage Account and in particular the options shown in the image below. The image shows a number of rule scopes including options to apply a rule to all blobs in a storage account and limit what blobs are processed based on filters.
Let’s start and explore the first option,
Apply rule to all blobs in your storage account
This option will apply the lifecycle management rule to all blobs included in the storage account. For example, if your storage account includes 50 containers, and you require all blobs last modified 30 days ago to be moved to the cool tier, all blob objects included in the 50 containers which meet the condition will be moved to cool storage.
That’s great but what if you wanted to target a certain container inside your storage account only? This is where the next option helps.
Limit blobs with filters
When selecting this option an additional tab named filterset appears.
Filters limit rule actions to a subset of blobs within the storage account. Instead of processing all blobs in a storage account, a filter set allows you to be more specific. In the example above I specify that I only want this rule to apply to blobs stored in a container named images. Therefore, all other containers will be ignored. I could also create a blob prefix rule, for example, images/pic. In this case the rule will process blobs inside the container named images, however, it will only apply to blobs starting with the name pic, such as pic1, pic2, pic3 and so on.
Therefore, as per my configuration shown in the image below, if any blobs included in the container images were last modified more than 30 days ago, they will automatically be moved to cool storage. Because I have specified that this rule should only process blobs in the container images, all other containers will not be processed by this rule.
Back to the details tab, there are a few more options to cover.
Blob Type: Pick the type of blobs you want to automate the lifecycle for. We have two options including,
Block blobs: designed for general purpose storage and allow the storage of different types of unstructured data such as images, videos, pdf, docx, notepad files and so on. Blob Storage is ideal for serving images or documents directly to a browser, streaming video and audio, storing data for backup and restore, disaster recovery, and archiving or storing files for distributed access.
Append blobs: designed for scenarios where data needs to be added to a blob in chunks without altering the existing content. Each new piece of data is appended to the end of the blob, a process known as appending. This type of blob is particularly well suited for fast append operations, making it ideal for use cases such as logging and auditing, where you want to add data to an existing blob without changing its current contents.
Next, we have the option Blob index match. Let’s explore this option.
If configured, this option will process blobs where keys and values have been created. These may have been added manually or based on automation by an application. As datasets get larger, finding a specific object in a sea of data can be difficult. Blob index tags provide data management and discovery capabilities by using key value index tag attributes. Consider a scenario where you have millions of blobs in your storage account, accessed by many different applications. You want to find all related data from a single project. You aren’t sure what’s in scope as the data can be spread across multiple containers with different naming conventions. However, your applications upload all data with tags based on their project. Instead of searching through millions of blobs and comparing names and properties, you can use Project = cloudbuild as your discovery criteria. Blob index will filter all containers across your entire storage account to quickly find and return the set of blobs from project = cloudbuild. But where are these index tags added, let’s take a look.
Right click a blob and click properties. In my case I have accessed testfile.txt. Scroll down and that’s where blob index tags can be applied. The blob index match available in a lifecycle management rule would be able to move files including blob index tags from one storage tier to another or even delete them if needed.
Blob subtype:
Next we have blob subtype, where base blobs is selected by default. Let’s explore the three options, but before we do, we first need to understand what snapshots and versions are.
Snapshots: a snapshot is a read-only version of a blob that’s taken at a point in time. For example, if you access a container and click a blob in your storage account, you’ll find the option to take a snapshot of your blob. The blob subtype of snapshots above is referring to blob snapshots. All snapshots share the base blob’s URI. The only distinction between the base blob and the snapshot is the appended DateTime value. When you create a snapshot of a blob, the blob’s system properties are copied to the snapshot with the same values. Snapshots are simply a copy of the blob taken at a point in time.
You have the option to restore a blob back to a snapshot you may have created previously. The snapshot option available in a lifecycle management rule is referring to these snapshots.
Versions: You can enable blob storage versioning to automatically maintain previous versions of an object. When blob versioning is enabled, you can restore an earlier version of a blob to recover your data if it’s erroneously modified or deleted. Versioning must be enabled on the storage account as shown in the image below. The below image shows the data protection tab when creating a storage account and the option to enable versioning under the section tracking.
Once enabled, if I was to make a change to a blob, the previous versions would be maintained.
Here is my original blob named testfile.txt and includes one line of data containing the words ‘test file’
I click on the versions tab and there are no previous versions, because I have not made a change to the text file as yet.
If I was to make a change to the file, a version of the original file would be stored. However, before I do this, I need to enable versioning on my existing storage account,
Access the storage account
From the left pane, scroll down to Data protection, located under the Data management section.
I click the option enable versioning for blobs and in my case I want to only hold 7 days of versions/changes.
Back to my blob testfile.txt, I make a change by adding another line of text and click save.
Click the versions tab and we see that the change has created a new version of the file. As part of the lifecycle management rule we are able to automatically move version of files from one tier to another.
Base blobs: this is the original file without any snapshots or versioning. The most recent file.
Note: The platform runs the lifecycle policy once a day. When you configure or edit a lifecycle policy, it can take up to 24 hours for changes to go into effect and for the first execution to start. The time taken for policy actions to complete depends on the number of blobs evaluated and processed.
If you disable a policy, then no new policy runs will be scheduled, but if a run is already in progress, that run will continue until it completes and you’re billed for any actions that are required to complete the run. Source: Azure Storage | Microsoft Learn
I hope you found this post useful. See you at the next one.
You want to change the encryption configuration for an Azure Storage account from Microsoft-managed key to Customer-managed key.
You click Customer-managed keys, you select a Key Vault and click Save
But you receive the below error,
Your system-assigned identity does not have access to the key vault. You can request access to the key vault by sending your admin the object ID from Identity under Security + networking when system-assigned status is enabled.
You have an issue, you can’t grant the storage account access to the KeyVault until a System Assigned Identity has been created, however, in this case we’re receiving an error that the Storage account does not have access to your Key Vault and therefore you need to grant access.
What you’ll find, that even though you receive the error above when clicking save, a system assigned Identity is created. So the process partially completes the setup but then errors, but the system assigned Identity is created.
Go to your Key Vault
Click Access Control (IAM) from the left pane if using RBAC and not access policies. If using the latter, click access policies from the left pane and configure your permissions accordingly.
Click Add > Add Role Assignment
Search for the role you wish to assign to the storage accounts system assigned Identity
Click Next
Click Managed Identity and +Select members
7. Click Next 8. From the Managed Identity drop down, select Storage Accounts and you should find your storage account System Assigned Identity listed
In this post, I discuss the differences between Azure default routes and user defined routes (UDR), including the configuration options available when creating a user defined route.
When we create Virtual Networks in Azure, the Azure platform automatically creates a route table for each subnet located inside a Virtual Network. To simplify, a route table is like a set of instructions. For example, a Virtual Machine asks the route table for directions. “Hello Route table, how do I get to this destination?”. The route table provides the Virtual Machine with the next hop, such as, if you wish to get to this destination, this is how you get there.
The default route table automatically created by Azure includes a number of default system routes. These system routes can not be modified or deleted, however, you can override the routes by creating custom routes, also known as User Defined Routes (UDR’s). These are routes created by the user, as in you, and can be modified and deleted as needed. I’ll cover UDR’s later in this post.
Note: This post is intended to provide a basic understanding of route tables. It is important to carefully plan your routing in your production environment, as incorrect routing configuration could lead to major issues.
How to view the Azure system default routes
One of the ways to view the default routes automatically created by Azure is as follows,
1. Locate a Virtual Machine in the Azure Portal 2. From the left pane, under settings, click Networking.
3. Click the network interface located under the IP configuration drop down menu as shown below.
4. From the left pane, scroll down and click Effective Routes, located under the Help section.
Allow a few seconds for the route table to load. We’ll study the default routes in the next section.
What is visible inside the Route Table
We see a number of active default routes, I have taken a small snippet and displayed it below.
The routes in the diagram are as follows.
Source:Default These are default routes created by Azure and can not be modified or deleted.
State: Active The state of the route. In the image above, active, meaning the route is enabled.
Address Prefixes:10.2.0.0/16 and Next Hop of Virtual Network The address space used for my Virtual Network is 10.2.0.0/16. That’s the IP address name space I configured when I created the Virtual Network. When I configured this address space, Azure automatically created a default route. You may have heard or read that resources inside an Azure VNET (Virtual Network) including resources in different subnets within a VNET can communicate with each other by default. This is the default route which allows that communication to happen.
For example, the below image displays one Virtual Network named VNET1. The VNET (Virtual Network) includes Subnet1 and Subnet 2. Each Subnet includes one Virtual Machine (VM1 and VM2). By default VM1 and VM2 can communicate with each other inside VNET1. If we were to deploy additional Virtual Machines to Subnet1 or Subnet2, all VM’s would be able to communicate with each other. This is the default behavior made possible by this default route.
Address Prefixes: 0.0.0.0/0andNext Hopof Internet When we build a new Virtual Machine (VM) in Azure, did you know that the Virtual Machine has outbound internet connectivity enabled by default? Meaning that I could logon to that Virtual Machine and browse the internet such as cloudbuild.co.uk and other websites. How? This is the default route which allows outbound Internet. This is like a catch all route, so if a route is not already located in the route table, Azure will route traffic for any address not specified by an address range within a Virtual Network to the Internet. In simple terms, “if a route does not exist, send it to Internet via 0.0.0.0/0”. However, there is one important exception to note, if the destination is for one of Azure’s services, Azure routes the traffic directly to the service over Azure’s private backbone network, rather than routing the traffic to the Internet.
You may be thinking, “resources have outbound internet connectivity by default. Is this secure?”. If you have had this thought, it’s good to know that you have security in mind, and you’re right, this is not secure by default. However, this default behavior is due to change in September 2025. Check out the following post for details, Default outbound access for VMs in Azure will be retired September 2025.
Next Hop: None Traffic destined to these address prefixes is dropped, it goes no where and will not leave the subnet. For example, when I created my VNET, I used an address space of 10.2.0.0/16 and we can see a default route for that in the route table above. I did not configure any other IP address name spaces such as 10.0.0.0/8 or 172.16.0.0/12 or 192.168.0.0/16, therefore Azure creates a default route to drop this traffic. Why? because I am not using these private IP ranges. However, if at a later date, I do decide to use one of these IP ranges in my VNET, Azure will automatically amend the next hop of none, to Virtual Networking. So none refers to not allowing traffic destined for that address prefix out of the subnet.
So that is an overview of the default routes, however, there is something to keep in mind. As you enable additional services such as VNET Peering and Virtual Network Gateway to name a couple, Azure will continue to create default system routes. For example, If I was to peer two Virtual Networks, VNET1 to VNET2. Let’s say VNET1 is located in the region UK South and VNET2 in region UK West. I have a requirement to connect the Virtual Networks together to allow resources in VNET1 to communicate with resources in VNET2. Peering would allow me to connect the Virtual Networks and the Azure platform will create a new default route automatically to allow resources to communicate with each other between the Virtual Networks. Below is a route which is created by Azure after I peer to another VNET configured with an IP address name space of 10.3.0.0/16. This address space belongs to the VNET I established a peer with meaning resources in VNET1 know how to get to resources in the peered Virtual Network of VNET2.
What if we want to override a default route or create additional routes?
We know that the default routes can not be deleted or modified. However, we can create custom routes also known as a User Defined Route (UDR) to override the default routes.
When we create custom/user defined routes, they are combined with the default system routes. However, if there are conflicting route assignments, user defined routes override the default routes. For example, we have a default system route of 0.0.0.0/0 with next hop to the Internet. This means traffic from a server is allowed to access the internet outbound. We decide to override this route because we want to route our traffic to a Firewall instead of being allowed unrestricted access to the Internet. We could create a custom route of 0.0.0.0/0 with a next hop of Virtual Appliance, and specify a firewall IP address. We now have a conflict because we have two routes with 0.0.0.0/0. One route to the Internet and one to a Firewall. In this case the default system route would change from active to invalid, and the custom route sending traffic to the firewall will take priority and display a status of active. As show in the image below.
We will discuss custom/user defined routes including next hop choices in the next sections.
Azure Custom/User Defined RoutesExplained
As explained earlier in this post, we can create custom/user defined routes to override the default system routes or create new routes in addition to the default routes. Let’s dig a little deeper.
Let’s say in our scenario we deploy a simple hub spoke topology as shown in the diagram below.
We know that by default VM1 and VM2 are allowed outbound internet connectivity. Can you remember which default route allows this routing to take place? Remember the default system route 0.0.0.0/0 with next hop of Internet? That’s the one. We also know that Virtual Machines in a VNET can communicate by default, so in VNET1 shown in the image above, VM1 and VM2 both residing in different subnets can communicate with each other. Can you remember which default system route allows this communication to happen within a Virtual Network? We discussed this further up in this post. I’ll let you go and check. 🙂
Creating a custom route tableto route traffic to a Firewall What if there was a requirement to override the default system route of allowing Virtual Machines to route out to the Internet using the default route of 0.0.0.0/0 and next hop Internet. As an example, let’s say in the diagram below, we wanted to route traffic for VM1 located in VNET1 to a firewall deployed in HubVNet. How would we do this? We would go into the Azure Portal, create a route table and add a custom/user defined route. We’ll cover how to do this in the next section below.
Note: you could also use other methods to deploy resources in Azure such as Powershell, CLI, ARM Templates, Azure Bicep or third party tools such as Terraform. I am focusing on deploying via the Azure Portal in this post.
Let’s go through the process of creating a route table and custom routes.
1. In the Azure Portal, search for Route tables
2. Click Route tables to create a new one 3. Input the details as required. I have inputted a few details below for demo purposes.
Propagate gateway routes: If you plan to associate the route table to a subnet in a virtual network that’s connected to your on premises network through a Virtual Network Gateway, and you don’t want to propagate your on premises routes to the network interfaces in the subnet, set Virtual Network Gateway route propagation to No.
When you disable route propagation, the system doesn’t add routes to the route table of all subnets with your Virtual Network Gateway routes. This process applies to both static routes and BGP (Border Gateway Protocol) routes. Connectivity with VPN connections is achieved using custom routes with a next hop type of Virtual Network Gateway. Route propagation shouldn’t be disabled on the GatewaySubnet. The gateway will not function with this setting disabled. If you set Propagate gateway routes to NO and associate the route table to the spoke subnets, the VMs in those subnets do not get the Virtual Network Gateway routes.
4. Click Review + Create 5. Once created, open the newly created Route Table. It will be an empty table without any routes. 6. Let’s create a User Defined Route. From the left pane, click Routes
7. Click the +Add button
8. We have a few options as shown in the image below.
In the next section we will go through these user defined route configuration options.
Azure User Defined Route configuration optionsexplained
Route name: give the route a suitable name.
Destination Type:
We have two options available in the drop down as shown above. We have,
IP Addresses (Address prefixes) Here you type the destination IP address range. Where is the resource such as the Virtual Machine wanting to go? For example, in the image below, resources in VNET1/Subnet1 are required to communicate with resources located in VNET2/SubnetA. We would specify the address space of VNET2/SubnetA as 10.2.1.0/24, along with some additional configuration we cover later in this post. For now let’s focus on the text highlighted red in the diagram below, destination 10.2.1.0/24.
Why do we need to create a route for VM1 to communicate with VM3 through HubVNET? VNET peering is non-transitive by default, which means that traffic from VNET1 won’t be able to reach a resource in VNET2 through a VNET in the middle. As shown in the diagram below.
Another example which may help to understand non-transitive. We have three letters A B C. Non-transitive in this example would mean that A and B can talk to each other. B and C can talk to each other. However if A wanted to talk to C or C wanted to talk to A, they could not go through B to reach each other. The same applies with VNET peering. We would need to create a user defined/custom route for this communicate between VNET1 and VNET2 to be possible as per the diagram below.
Service Tag: From the destination type drop down, we have another option of Service Tag. A service tag includes a group of IP addresses from an Azure service. Microsoft manages the addresses included in the service tag and automatically updates the service tag as addresses change. Therefore, minimising the complexity of frequent updates to user defined routes and reducing the number of routes you need to create. In simple terms, a service tag is a group of IP addresses managed by Microsoft. If new IP’s are added or decommissioned, Microsoft manage this process so we don’t have to. If there was a requirement for you to route traffic to an Azure Service, you wouldn’t need to specify the IP ranges for that service as you could use a built in managed service tag which already includes all the required IP addresses.
Next hop type The next hop type determines the type of device that traffic is forwarded to when it matches the address prefix/destination type of the route. For example, if the resource wants to reach a specific Virtual Machine in another Virtual Network, how does it get there? Firstly the destination is matched and then the traffic is forwarded to the next hop type such as a Firewall.
Let’s go through the options in the Next hop type drop down list.
Next hop: Virtual Network Gateway
You’ll notice that when you click Virtual Network Gateway, the option to type a Next hop address is greyed out. This is by design. Going off topic slightly but still related, when we configure peering between Virtual networks, there are configuration options available which we must configure if we require for the VNETs to use an Azure Virtual Network Gateway. I won’t be going into details on VNET peering, but I have created a post explaining VNET peering configuration at the following link Azure Virtual Network Peering Options Explained.
Back to next hop of Virtual Network Gateway, to allow for this to work we need to configure two settings.
1. Configure VNET peering options as documented in the link I shared above. 2. Create a User Defined Route
But why use Virtual Network Gateway as a next hop? you may need to route traffic from a VNET to on premises through a Virtual Network Gateway. You may already be aware that one of the use cases of a Virtual Network Gateway is to connect your Azure environment to on-premises. Or you could use a Virtual Network Gateway to forward traffic from one VNET to another in a hub spoke topology. Example, a Virtual machine in VNET1 needs to communicate with a Virtual Machine in VNET 2 via a VNETHub. A Gateway located in the VNETHub could be used as a forwarder to route traffic from VNET1 to VNET2.
Next hop: Internet
Next hop of Internet is one we came across earlier. There was a default route of 0.0.0.0/0 with a next hop of Internet. If you don’t override this route, Azure routes all traffic destined to IP addresses not included in the address prefix of any other route, to the Internet. You may wish to route the traffic to Network Virtual Appliance such as a Firewall or an inspection/logging appliance.
However, if needed, you can specify Internet as a next hop when you want to explicitly route traffic destined to an address prefix directly out to the Internet, or if you want traffic destined for Azure services with public IP addresses kept within the Azure backbone network. As explained earlier in this post, if traffic is destined for Azure services with public IP addresses, that traffic is kept within the Azure private backbone network and does not route out to the Internet.
Next hop: Virtual Appliance A virtual appliance is a Virtual Machine that typically runs a network application, such as a firewall. You can use a next hop of Virtual Appliance also known as a Network Virtual Appliance (NVA) to route traffic to an Azure Firewall, Cisco Firewall, Palo Alto Firewall, Traffic Inspection Appliance, and more. Azure supports a number of third party appliances available from the Azure Market Place. You can also access the market place from the Azure portal at portal.azure.com
For example, as per the image below, we have a route table associated with VNET1/Subnet1 with a destination of 10.2.1.0/24 which belongs to VNET2. We have a HubVNet between both Virtual Networks. We know that VNET peering is non-transitive so we associate a route table to VNET1/Subnet1 instructing resources that if there is a requirement to communicate with resources in VNET2/SubnetA, the next hop is a virtual appliance. The virtual appliance in this case is an Azure Firewall located in HubVNet.
Next hop: None
Specify none when you want to drop traffic to an address prefix, rather than forwarding the traffic to a destination. None also represents a black hole. Packets forwarded to a black hole will not be forwarded at all. You will also notice a number of default routes with a next hop of none. This is because Azure creates system default routes for reserved address prefixes with None as the next hop type. If you decide to add another address prefix in your Virtual Network in future, Azure will amend the default route from none to Virtual Network. In the image below the option to specify a next hop address is greyed out as we’re dropping the traffic, it’s going no where, so we don’t need to specify an address.
Next hop: Virtual Network
We came across next hop of Virtual Network earlier. Can you remember where? It was a default system route created automatically which allows resources to communicate with each other inside a Virtual Network. We also have the option available when creating a User Defined Route with the Next hop address greyed out, as shown in the image below.
A question you may have, if there is already a system route which allows resources to communicate inside a Virtual Network, why would you want to create a user defined route with next hop of Virtual Network?
The default route we visited earlier allows all traffic within the IP address name space of 10.2.0.0/16 to communicate with each other. Azure automatically added this route for all subnets within the VNET, so if I created three subnets in my VNET, all subnets will include a default route with next hop to Virtual Network of 10.2.0.0/16. For example, I have the subnets below configured in VNET1,
According to the default route shown in the image below, all resources inside the three Subnets above can communicate with each other within VNET1. This means that traffic sent to any address between 10.2.0.1 and 10.2.255.254 would be routed within the Virtual Network. If I created additional Subnets in future, they would automatically be allowed to communicate with resources in Subnet1, Subnet2 and Subnet3.
But this does not answer why we would want to create a user defined route with next hop of Virtual Network. Let’s move onto a scenario with a possible use case.
Scenario
1. We have a requirement to force all traffic from 10.2.0.0/16 to a Network Virtual Appliance (NVA) for inspection and logging purposes. We must override the default route of next hop of Virtual Network. The virtual appliance is located in the same VNET, but in a different subnet. You may be thinking, we could add a route as follows, destination 10.2.0.0/16 with next hop of the IP address of the Virtual appliance.
Correct, but let’s add a little twist to this scenario,
2. Traffic destined for addresses between 10.2.0.1 and 10.2.0.254 (10.2.0.0/24) remains within SubnetA, rather than being routed to the virtual appliance, because there is no requirement for inspecting or logging the traffic. So the aim here is that if machines within SubnetA communicate with each other within the subnet, there is no requirement to route this traffic to a Virtual Appliance.
The diagram below sums up the above scenario. Traffic from SubnetC needs to be routed to the NVA located in SubnetB for packet inspection/logging. Traffic between VM1 and VM2 inside SubnetA is not routed to the NVA, however, if VM1 or VM2 need to communicate outside of SubnetA, such as communicating with VM3 or VM4 in SubnetC, then that traffic needs to be routed to the NVA first.
How would you accomplish this?
First, we create a User Defined Route with a destination of 10.2.0.0/16 and next hop of virtual appliance 10.2.1.4 as shown in the image below. This route would override the default system route of 10.2.0.0/16 with next hop of Virtual Network.
Below is an image showing what the routes would look like once we apply the route table to SubnetA. As you can see the default route has become invalid and all traffic for 10.2.0.0/16 now routes through an Network Virtual Appliance which has an IP address of 10.2.1.4.
This routes all traffic inside the Virtual network 10.2.0.0/16 to a Network Virtual appliance.
However, we have one more requirement. We don’t require traffic communicating inside Subnet A 10.2.1.0/24 (between Virtual Machines) to be routed to the NVA. But, according to the route we created earlier, all traffic from all subnets will be routed to the NVA.
To resolve scenario 2, we create another route as shown in the image below. The image shows a User Defined Route with destination of 10.2.0.0/24 (SubnetA) and next hop Virtual Network.
This is what the route table looks like now,
We now have two active routes. Traffic for the address prefix 10.2.0.0/16 is routed to the Virtual Appliance. Traffic for the address prefix 10.2.0.0/24 (SubnetA) keeps traffic within the Subnet.
So which user defined route will apply first as both meet the criteria? It’s the one with the longer prefix, in this case CIDR notation 10.2.0.0/24 has a longer prefix and takes priority when traffic is destined for IP’s in the range of 10.2.0.1 – 10.2.0.254 which belongs to SubnetA.
When outbound traffic is sent from a subnet, Azure selects a route based on the destination IP address, using the longest prefix match algorithm. For example, a route table has two routes: One route specifies the 10.2.0.0/24 address prefix, while the other route specifies the 10.2.0.0/16 address prefix. Azure directs traffic destined for 10.2.0.5 to the next hop type specified in the route with the 10.2.0.0/24 address prefix. This process occurs because 10.2.0.0/24 is a longer prefix than 10.2.0.0/16, even though 10.2.0.5 falls within both address prefixes.
So what if there was an IP of 10.2.1.7? Azure directs traffic destined for 10.2.1.7 to the next hop type specified in the route with the 10.2.0.0/16 address prefix. This process occurs because 10.2.1.7 isn’t included in the 10.2.0.0/24 address prefix, making the route with the 10.2.0.0/16 address prefix the longest matching prefix.
If you wish to learn more about longest prefix matching, the following article explains the process in detail. Longest Prefix Match Routing(I am not affiliated with this company).
How to associate a route table to a subnet Once you have created a route table with your user defined routes, you can attach a route table to a subnet. A route table can be associated to zero or more subnets. Route tables aren’t associated to Virtual Networks. You must associate a route table to each subnet you want the route table associated to.
To associate a route table with a subnet,
1. Search and click Route tables
2. Click the route table you want to associate to a subnet
3. From the left pane, under Settings, click subnets.
When configuring an Azure Virtual Machine Scale Set (VMSS), you have the option to define autoscaling rules. Autoscaling is the process of dynamically allocating resources to match performance requirements. As the volume of work grows, an application may need additional resources to maintain the desired performance levels and meet service level agreements (SLAs). When demand decreases and those additional resources are no longer required, they can be automatically removed to minimise costs.
As part of the autoscale configuration within an Azure Virtual Machine Scale Set, we can set both a duration and a cool down period. In this post, I will explain the differences between these two options using a couple of practical scenarios, and I’ll also walk through a simple experiment to show how the cool down duration behaves in action.
Note that this demo reflects what I observed during my own testing. The behaviour may differ from how some explanations describe the cool down period.
Want to learn more about scaling in Azure? If you’d like to dive deeper into Azure VM Scale Sets, you can start with the Microsoft Learn article, Azure Virtual Machine Scale Sets Overview.
In addition to Azure VM Scale Sets, several other Azure services support autoscaling, including Azure App Service Plans. With App Service Plans, you can configure autoscale rules based on metrics such as CPU usage, memory usage, HTTP queue length, and more. Essentially, the App Service Plan includes a built‑in VM Scale Set under the hood. Learn more: Azure App Service Plans
Note:It’s important to plan and configure your scaling rules carefully to avoid performance issues, unnecessary scaling, or unexpected costs caused by incorrect settings. The metrics used in this post are purely for demonstration purposes to observe how the cool down period works.
Let’s get started
Duration in Azure VM Scale Set
Duration is the time window the VM Scale Set will look back over when evaluating metrics before deciding whether to scale.
For example, in the scaling rule below, I have configured:
If CPU Percentage is greater than 85%
for a DURATIONof 10 minutes
Increase the Instance/VM (Virtual Machine) count by 1
For this condition to trigger, the CPU must remain above 85% continuously for the full 10 minute duration. The VM Scale Set reviews CPU utilisation over the past 10 minutes, and if the CPU has consistently been above 85%, it will add another instance/VM.
Below is a screenshot of an Azure VM Scale Set rule. I have used a green arrow to highlight the DURATION field.
Cool down in Azure VM Scale Set
The COOL DOWNperiod comes into effect after a scale‑in (removing a VM instance) or scale‑out (adding a VM instance) event is triggered. For example, if I set a COOL DOWN period of 10 minutes, this instructs the scale set not to scale again for another 10 minutes. Essentially, you’re asking the scale set to pause during that COOL DOWN window so the environment can stabilise and the system can assess whether the previous scaling action has had an impact on CPU utilisation.
I have used a blue arrow to highlight the COOL DOWNfield in the image below.
Let’s take a look at how the scale rule behaves on a timeline.
Note:Based on the demos you’ll see shortly, I found that the VM Scale Set evaluated the full 10 minute duration using all available metrics, including those collected during the cooldown period. Continue to learn more.
In the diagram below, we start with one VM in our scale set.
1. At 3pm CPU for VM1 goes above the threshold of 85%, and constantly remains above the threshold for a duration of 10 minutes (until 3.10pm).
2. At 3:10pm, the scale set looks back over the previous 10 minutes (from 3:00pm to 3:10pm). Because the CPU was consistently above 85% for that entire window, the scale set adds another VM, bringing the total to two VMs.
3. At the same moment (3:10pm), the cool down period begins. During this cool down window, no additional scale‑in or scale‑out actions will occur. However, based on my demo, the cool down period did not pause time or stop metric collection. As shown in the diagram, adding a second VM at 3:10pm reduces CPU utilisation to around 50–60%, but metrics continue to be gathered and evaluated in the background. The cool down period simply instructs the scale set to temporarily pause scaling actions, not to stop analysing data.
4. The additional VM stabilises the workload, and the scale set continues operating normally with CPU averaging between 50% and 60%.
5. At 3:40pm, CPU utilisation rises again and remains above 85% for another full 10 minute duration. At 3:50pm, the scale set looks back over that 10 minute window and decides to add another VM.
I then moved onto another scenario to see how the scale set responds under different conditions.
What if, after the second VM was added, the CPU did not stabilise and instead remained consistently above 85%? Would the VM Scale Set add another VM immediately after the cooldown period ends, or would it wait for another full 10‑minute duration before deciding to scale out again?
Note:This is exactly why it’s important to plan your scaling rules carefully. A reminder that this post was created to test a few scenarios and observe how the VM Scale Set duration and cool down period behave under different conditions.
Firstly, if you come across a scenario where the VMSS adds an additional VM and it still doesn’t make a difference, for example, the CPU remains above 85%, then you should consider investigating and possibly reconfiguring your scaling rule. That usually indicates the rule isn’t aligned with the workload pattern.
However, Because I am experimenting, I want to understand what happens next.
To test this behaviour, I deployed a new Virtual Machine Scale Set and configured a VM Scale Set rule as follows:
If CPU Percentage is greater than 0.1% (Yes, I know a metric you would never use in production, but it’s for testing purposes only!)
for a DURATIONof 10 minutes
Increase the VM (Virtual Machine) count by 1
COOL DOWN period of 10 minutes
The diagram above shows that I start with one Virtual Machine at 3pm. Because of the intentionally low CPU threshold of 0.1%, the condition is met instantly. The VM Scale Set then looks back over the previous 10‑minute duration (from 3:00pm to 3:10pm) and adds another VM instance. A 10 minute cooldown is triggered to pause any further scaling actions while the scale set stabilises.
However, as shown in the diagram, it was interesting to see that metrics continue to be monitored and recorded in the background. The additional VM has not made any difference, as CPU utilisation remains above 0.1%.
At 3.20pm, the cooldown period of 10 minutes expires.
But what happens now?
CPU has remained above 0.1% throughout the entire cooldown period, and the extra VM has not reduced utilisation. So what does the VM Scale Set do next?
Does it immediately trigger another scale‑out event and add a third VM right after the cooldown ends at point A (3:20pm)?
Or does it wait for another full 10‑minute duration before scaling again, adding the next VM at point B (3:30pm)?
My findings from the demo showed the following:
Answer: Another VM was added shortly after the cooldown period ends at around 3:20pm. The VM Scale Set takes into account the previous 10 minutes of metrics, including those collected during the cooldown period. The cooldown period was used to pause scaling actions, it did not pause time or stop metric collection. Under the hood, metrics were still being analysed and recorded continuously.
Below are the scaling logs from my testing:
Let’s zoom in and focus on the timestamp column, which shows the exact times the VM Scale Set added a new VM instance. See the image below.
According to the time stamps above:
at 9.07am a VM scale-out operation was triggered to add another VM/Instance. This happened because CPU utilisation was greater than 0.1% for a 10 minute duration. The VM Scale Set looked back over the window from approximately 8:57am to 9:07am and confirmed the condition was met.
When the scale‑out event occurred, a 10 minute cooldown was also initiated to allow the new VM to deploy and for CPU utilisation to stabilise.
The cooldown period ended at around 9:17am. However, immediately after the cooldown expired, another scale out operation was triggered. The VM Scale Set did not wait for another 10 minute duration.
Because the CPU threshold was set to 0.1%, the VM Scale Set never stabilised. CPU remained above the threshold continuously, so the system kept scaling out, adding another VM after each cooldown period.
What did I find? When the VM Scale Set looks back at the duration window, it does include the metrics collected during the cooldown period. The cooldown only pauses scaling actions, it does not pause metric collection. Metrics continue to be gathered and analysed in the background, and those metrics are used to decide whether another scale operation is required.
Note: Don’t forget to configure a scale‑in rule so the scale set can remove VMs when CPU levels drop during quieter periods. Without a scale‑in rule, the VM Scale Set will only ever scale out to the maximum number of VMs you’ve configured, as it has no way of knowing when to scale back in.
In my demo, because the CPU threshold was set to 0.1%, the VM Scale Set would never stabilise and therefore would never scale in. Of course, this is something you would never do in production; the purpose of this demo was purely to observe how the cooldown and duration periods behave.
Always plan and configure your VM Scale Set rules according to your workload requirements.
And that’s it for now. I hope you found this post useful, and if you have any feedback, please feel free to leave a comment below.
See you in the next post.
Subscribe
Subscribe to new tech posts.
We will never send you spam email or forward your details to third parties.