In previous posts, I configured group policy for FSLogix and installed the FSLogix App within my WVD platform. The post can be located at the following link: Configure FSLogix Group Policy and install FSLogix App
I also configured Azure Files to store my Windows Virtual Desktop FSLogix User Profile data. The post can be located at the following link: Use Azure Files for FSLogix User Profile Data with Window Virtual Desktop
In this blog post I will be configuring FSLogix Application Masking. Application Masking is used to manage user access of installed components. Application Masking can be used in both physical and virtual environments. Application Masking is most often applied to manage non-persistent, virtual environments, such as Virtual Desktops.
Application Masking manages access to Applications, Fonts, and other items based on criteria. The Application Rules Editor is used to describe the item, such as application, to be managed. The Editor is also used to define criteria rules are managed by. For instance, GitHub should be hidden from the Accounting group. Things you can do with the Apps Rules Editor:
- Create new Rule Sets
- Edit existing Rule Sets
- Manage the user and group assignments for Rule Sets
- Temporarily test rule-sets
In this blog post, I will configure application masking on my WVD session hosts. Let’s get started.
1) Login to the Azure Portal portal.azure.com
2) For the purpose of this demo, I already have a domain controller, WVD session hosts and AD Sync to Azure AD (AD Connect) configured. I have powered on all the required VM’s within the Azure Portal.
3) Before we get started, i’ll create a WVD Admin account. The default domain admin account is a protected admin account, therefore, it’s not sync’d to Azure AD and will not have access to resources in Azure such as Azure File share. I have setup a new account within Active Directory named WVDAdmin, granted domain admin and also added to my previously created WVD User group. I have also created a new group named Sales and added users to the group. I will be using the Sales group when configuring my FSLogix rule set assignment and testing.
4) If you have just created your objects within AD, sync the accounts to Azure AD by running the below Powershell command. You could also wait for the default 30 min sync interval.

5) Next, I will be installing the FSLogix Rule editor on a window 10 image outside of the Windows Virtual Desktop environment. This VM must be a duplicate of your Windows Virtual Desktop session host to avoid issues when testing. I will also configure Rule Sets. Rule Sets are assigned to users, groups, and other entities using the Rules editor. Before using the Application Rules Editor, it must be installed. Let’s get started by logging into a VM outside of the WVD platform (Login as WVD Admin) and download and install the rules editor from the following link FSLogix Rules Editor
Visit the link above and read through the licensing and entitlement section. When ready, download FSLogix and extract the folder


6) FSLogix downloaded and folder extracted. Access the extracted folder, click x64 > release and execute the file FSLogixAppsRuleEditorSetup

7) Agree to license terms and conditions and click install when ready


8) Launch the rule editor application (Right click and run as administrator)

9) Click File and New, or click the new icon available towards the top of the application

10) For the purpose of this demo, I will hide Notepad so will name my rule HideNotepad as shown below. Click Enter file name when done

11) A few options appear which may be of interest to you. For the purpose of this demo, I will be creating a Blank Rule Set and clicking OK
If you’re app is already installed and visible, click Choose from installed programs. This is another reason why you must run the rules editor from a VM which matches the session hosts running within your WVD Pool

12) Next, click on the + icon to create a new rule, as shown below

13) There are a number of options to choose from.
Hiding Rule – hides the specified items using specified criteria

Redirection Rule – causes the specified item to be redirected as defined

App Container Rule – redirects the specified content into a VHD

Specify Value Rule – assigns a value for the specified item

14) For this demo, I will be using the Hiding Rule. Click browse and because I will be hiding the notepad application, I will be selecting file. Other options are available depending on what component you wish to create a rule for.

15) Browse to the application .exe located in the system32 folder.

16) Click Ok and and click Yes


17) The above will hide notepad exe located in the system32 folder but we now need to hide the shortcut which appears in the start menu
Click the + icon to create another rule

Note that the path includes the username you’re currently logged on with. C:\Users\WVDADMIN\AppData\Roaming\Microsoft\Windows\Start Menu\Programs\Accessories. Ensure you change the username to * as shown below.

18) Create another rule within the existing set and hide notepad.exe located within c:\windows\ as shown below

19) Before rolling this out, testing would be useful. FSLogix offers a testing feature. The check box icon highlighted below will allow you test the rule on the system you’re on. I previously mentioned that it’s important to install the rules editor on a VM outside of your WVD Solution that is a duplicate of your session hosts.
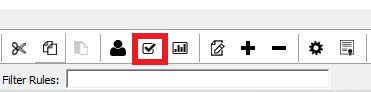
20) Checkbox enabled, check if Notepad is still accessible

You’ll find that when you click Notepad from the start menu, nothing happens. But the icon is still visible within the start menu because the start menu has already been built. It will disappear when we test by assigning the policy shortly. You will find that notepad.exe has disappeared from C:\Windows and C:\Windows\System32 folders
21) Uncheck the testing box and click the manage assignments icon as shown below

22) For this demo, I will be hiding Notepad for the sales group
Please note that assignments are executed from top to bottom. For example, if two assignments were made for the same Rule Set. The first assignment applies the Rule Set to Everyone, the second specifies the Rule Set does NOT apply to the Sales Group. In this case, the Rule Set would apply to everyone except the Sales Group.
If the assignments above are reversed, so Everyone is after the exclusion Sales Group, the Rule Set would apply to Everyone including the Sales Group.
23) By default the rule applies to no one. I only want to allow users within the sales group to access Notepad. Note that if you click on Everyone below, the option is set to Rule Set does not apply to user/group.

Click Add and for this demo I will be selecting a group. There are a number of options available in case you wish to apply the assignment to other then a group.

24) I select an existing group names Sales and apply the rule for everyone apart from sales
The rule set below will prevent all users excluding members of the Sales group from accessing notepad.

25) Click save or save all if you have created further rules sets.

26) FSLogix provide a feature named AD reporting to test permissions. See icon below
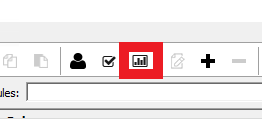
27) Click the AD reporting icon displayed above and click new query as shown below

28) Let’s test by inputting details of a member of the Sales group. The assignment will not apply because the assignment allows members of the sales group access to Notepad.

29) And now let’s test a user outside the Sales group. The assignment will apply

30) Save your rule sets if not already done so. We can now move onto applying the rule sets to our session hosts
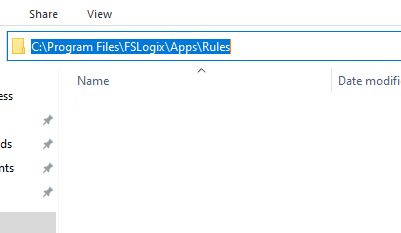
31) Browse to the location where the FSLogix rule sets are saved and copy the rules. See below

32) The next step involves rolling out the files to your session hosts. You could use automation tools to copy the files to your session hosts.
The below files need to be copied:
Copy files from: Documents\FSLogix Rule Sets

to: C:\Program Files\FSLogix\Apps\Rules
You’ll find that a number of files are automatically created by the FSLogix application in the CompiledRules location after copying the files. Files are copied to the Rules folder and the automatically created files are compiled in the Compiled Rules folder.

In a production environment, you will want to create a network share including a copy of the rule sets from where you can automated the copy of files to your session hosts and update as and when required from one central location.
For the purpose of testing, I have copied the files directly to one of my two session hosts and placed the other one into Drain mode so it’s not available when I login to WVD to test

Before copying files, both folders are empty

After copying files to Rules folder only. Files are automatically created in the CompiledRules folder as shown below

Time for testing
I’ll login with a user who is not part of the Sales group
Notepad within the start menu is not available because user cloudbuild1 is not part of the Sale Group so therefore is no longer able to view.

And the notepad.exe file is no longer visible

Thanks for reading and stay tuned for further posts

